
You are here
Bring accessibility in your front-end projects easily

We don’t have to work often on a project that must be accessible. Our clients, as ourselves are not enough aware of this and we tend to approach this topic with some apriori:
- It’s complicated
- Accessible websites are ugly
- This is for 3 blind people and 2 deaf people
- It’s expensive
In this post, I will tackle the first apriori of this list, and show how we can bring accessibility in our projects quickly and easily. The result won’t be perfect because accessibility is not only about front-end development but also all the project team (UX, Designer, Content Editors, Back-end developers, …). But you will see that very simple things can have a very important impact on accessibility.
Use the lang attribute
This can seem to be obvious, but I see regularly websites that don’t have it. The utility of this attribute is that it allows screen readers to render content with correct pronunciation and, when specified, the correct accent (Canadian French for example). Test with NVDA or VoiceOver to read French with your screen reader configured in English and you’ll never forget to put this attribute again!
Do not use maximum-scale = 1.0 in the meta viewport
The problem with this property is that it prevents users from zooming in. Imagine that the written text is a little small, even for you who have a good view; Your reflex will be zooming in, except that this property is present. Too bad…
Do not delete the outline
This represents 1 line of CSS not to write, or to delete if you use a framework. I can only invite you to go to this site that says it all.
To sum up, the outline is essential when using keyboard navigation. To make a quick test, go to the 20 minutes’ site and go to the topic Cinema, which is in the main menu, using only the tab key (and without looking at the URL at the bottom of the page ;)). Not that simple, is it? If the outline style was present when taking focus, you would have seen right away where you were.
Set up skip links
To do this, you just have to put those links at the very beginning of the page to the main areas of your site. They can be hidden by default but must appear while they are focused. The most common skip links are “Skip to menu” “Skip to content” and “Skip to footer”. Then, put an anchor on the area to be targeted. This allows people using keyboard navigation (or other assistive technology) to move directly to the area that interests them, without having to tabulate through a whole menu for example. It takes very little time to integrate them and this saves a lot to your users in addition to comfort. Here is an example of setting up these links:
<ul class="skip_links">
    <li>
        <a href="#nav" class="a11y_hidden">Skip to navigation</a>
    </li>
    <li>
        <a href="#page" class="a11y_hidden">Skip to content</a>
    </li>
</ul>

<nav role="navigation" id="nav" tabindex="-1">
    <ol>
        <li>
            <a href="/">Qui sommes-nous?</a>
        </li>
    </ol>
</nav>

<main role="main" id="page" tabindex="-1">
    <p>
        Begining of main content which is accessible faster thank to skip links.
    </p>
</main>
Use consistent semantics
<span onclick="btnFunction();" class="btn btn-primary">Click here</span>Why do this while there is an HTML <button> element?
This is also true for links, it is very common to see links that are used as buttons. Yet it makes more sense to use a link to redirect somewhere and a button to do another action.
We can also think of using the ordered, unordered, and definitions lists to structure information, HTML5 structural tags such as <header>, <footer>, <main>, <section>, … which give meaning contrary to <div> or <span> that haven’t semantic value.
ARIA is your friend
Use ARIA roles to help screen reader users find their way into your pages.
<header role="banner"> <footer role="contentinfo"> etc … these are just attributes to add to elements that are used very often now.
If you use JavaScript events, ARIA attributes can help your users on many ways (unfolded menu or not, mandatory fields in a form, tab active in a navigation and many others).
Organize levels of titles
Navigation by screen reader can be done by titles. Thus, it is important to have a logical order in these. If for aesthetic reasons you need <h3> after <h1>, use CSS to get the desired rendering and use a <h2> to follow this order.
Put an alt attribute on images
The alternative text is useful for people using a screen reader. But it must be set according to certain criteria. If it is a decorative image and it’s not essential to understanding the content, you must put a alt="".
On the other hand, if the image is essential to the understanding (text in the image, button image …) it’s necessary to fill this alt in a pertinent way, taking, for example, the text contained in the image.
This is not a simple criterion. To do this, you can rely on the following resource which perfectly schematizes the reflection to have.
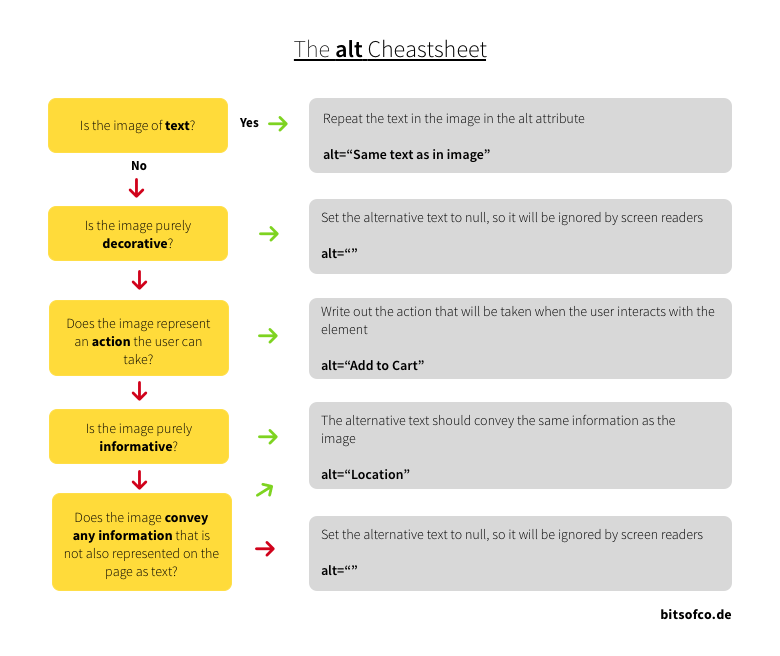
- Is the image of text? If yes, repeat the same text in the image in the alt attribute. For example,
alt="Same text as in image". - Is the image purely decorative or for styling purposes? If yes, set the alternative text to null, so it will be ignored by screen readers. For example,
alt="". - Does the image represent an action the user can take? If yes, write out the action that will be taken when the user interacts with the element. For example,
alt="Add to Cart". - Is the image purely informative? If yes, the alternative text should convey the same information as the image. For example,
alt="Location". - Finally, does the image convey any information that is not also represented on the page as text? If yes, the alternative text should convey the same information as the image. If no, set the alternative text to null, so it will be ignored by screen readers.
Here is the full article.
A bit of testing
Try browsing your page using only the keyboard, this will allow you to quickly solve accessibility issues. Is the outline hidden? Is the navigation order logical in relation to what it should be? Are the skip links present and functional? If these points are verified, this is a good start!
Another test is to disable your CSS. This allows you to quickly see if your content is displayed logically or if you have text alternatives on images filled in CSS. For example, if you use a CSS sprite to put a list of social network buttons, you must have a hidden text that allows screen readers to know what these images are. If you have not filled in this text, you will see it quickly with this trick.
Conclusion
Here are the methods I put in place on all new projects I work on even if accessibility is not in the scope. As you can see, it’s quick to set up and does not ask to dive into repositories or have a big knowledge on the subject. It also has no impact on the design (except for the outline but it is very minor) and it helps people using assistive technologies, although much remains to be done.
Some tools to go further
A very diverse list of resources on accessibility (articles, best practices, JavaScript plugins, …)